Where to find TACACS+ server?
In the first part of this series, we had a brief introduction to the TACACS protocol and how it helps in centralizing and securing access to network devices. This post will be a continuation and will be discussing the options we have available for implementing TACACS+ and will contain an example of how to use one of the free TACACS+ servers to implement the AAA functions we have talked about earlier. In this post i will be using TACACS and TACACS+ interchangeably when referring to the protocol.
TACACS+ can be implemented using commercially available solutions such as Cisco’s widely deployed Access Control Server (ACS) or using freely available open-source implementations. During my research, i found out that there are limited choices when it comes to TACACS+ software whether commercial or free as compared to other products. Below i am posting the links to some of the sites i have come across for commercial solutions and open source or free implementations.
Commercial
Open Source/ Free
TACACS Demonstration
In this post, i have decided to try TACACS+ from TACACS.net installed on a Windows 7 machine for the simple reason of its simplicity and ease of installation and configuration. The folks at TACACS.net have provided plenty of documentation on just about everything related to installation and configuration of their software. I highly recommend reading the guides especially if advanced configurations are required.
For the client i have used a Cisco 1801 router since i have one at hand to play with. The free open-source Cisco simulation software GNS or the virtual router Vyatta can also be used as a client if you can’t find a real router or switch for testing. Below is a diagram showing the setup i have used for this post.

The steps i have followed are downloading and installing the TACACS server on a windows 7 machine, configuring the TACACS server, configuring the Cisco 1801 router, testing authentication to the router via the TACACS server, and finally checking the accounting functionality of the TACACS server. The TACACS users used for this test will be locally configured on the TACACS server again for the sake of simplicity.
TACACS Installation & Configuration
Installation
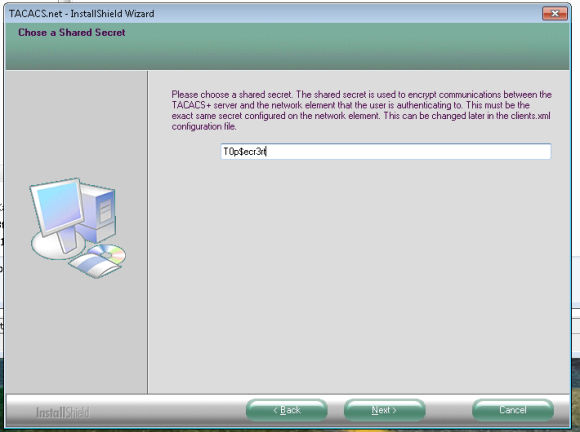
The installation of the TACACS server is a straight forward process made easy by an installation wizard. Clicking through a few steps will get the software installed and ready for configuration. During the installation, as shown below, we need to specify a pre-shared key that will be used between the TACACS server and the clients. The purpose of this key is to encrypt the communication channel between the server and the client so that credentials are securely transmitted between the two.
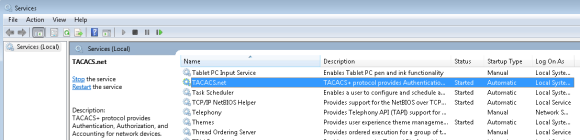
After the installation is complete, you can verify if the installation was correct in couple of ways. One way is by checking whether the TACACS service is installed and its status is running. The other way is to open a command prompt and use the ” netstat -abn” command to check if the server has opened a TCP port numbered 49 and is listening for connections.

Server Configuration
By default, the server is configured to use the localhost IP address 127.0.0.1 of the computer for accepting connections as shown above. We need to change this so that the server listens on the IP address required. Open the file “tacplus.xml” located in %ALLUSERSPROFILE%\TACACS.net\config\ using notepad or wordpad and locate the “Local IP” section and change the IP to reflect the IP address of the real IP address of the server. For sake of clarity, i recommend using Notepad++ which has so many added features to open the files mentioned here. In my setup, the IP address of the server will be 192.168.244.124. Besides the IP address, there are a number of other options that can be changed about the server configuration but for the purpose of this post i have kept all other options at their default. After applying and saving the change, the TACACS service needs to be restarted to reflect the changes. Once you verify the IP address you have assigned is listening on TCP port 49 by checking netstat, we can do further test by using Telnet to connect to that port from the same computer or a different machine. If you are not able to connect then you will need to check if there is a firewall blocking the connection.


User Configuration
Now that the TACACS server is up and listening for TACACS requests on the IP address we have assigned, we need to configure the users who will be authenticated. There are number of ways TACACS users credentials can be configured. The credentials can be locally configured using the configuration file provided by the installation or can be pulled from an Active Directory or LDAP Server. User accounts on the local system from where the users are connecting can also be used. The configuration file by default also enables users in the local administrators group access as a fallback option. This is when a user can not remember their password or the TACACS server becomes unavailable. For the purpose of this post, we will be using locally configured accounts in configuration file. An example of each of user type is given within the configuration file.
Open the file named “authentication.xml” under the C:\ProgramData\TACACS.net\config\ directory and add the lines shown in the screenshot below. The easiest way for adding the user configuration is to copy the examples found in the file and editing the fields. In this example i copied the example group “Network Engineering” and it associated users and renamed the group to “Net Admins” and the two users accounts as “User1” and “User2” with a clear Login & Enable password of “P@ssw0rd”. We can insert a DES encrypted version of the password also in the password field for added security. In the production environment, we need to harden the TACACS server, put it behind firewall to limit who can connect to it, and must ensure the sensitive files are protected and monitored. If you decide to copy from the examples given, make sure you remove the comment section of the XML file which are denoted by “<!–” for beginning and “–>” for ending.

Testing
TACACS.NET provides two tools for testing your configuration called Tacverify & Tactest. Tacverify is used for checking errors in the server configuration files while Tactest checks to see if you can connect to the TACACAS server using credentials. They are both found under the TACACS installation folder which in our example is located at C:\Program Files (x86)\TACACS.net. To list the available options relating to the tools we can issue -? with the commands.


As shown from the results of the commands above, Tacverify shows our server configuration is okay and the authentication test done by Tactest was successful. We now should be ready to configure our clients to use the TACACS server for authentication, authorization, and accounting.
Client Configuration
TACASCS configuration on clients is different from one client to another depending on the manufacturer. For the purposes of this demonstration, we are using Cisco 1801 router as a client. The commands required for enabling TACACS are shown in the screen shots below. A TACACS authentication list called “use-tacacs” is configured and applied on the VTY lines of the router. Also as mentioned above, we need to specify the TACACS pre-shared key entered at the server.


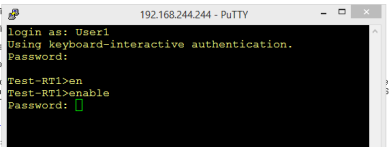
Authentication Test
Once the configuration of the Cisco router is ready, we are now ready for testing TACACS authentication. Using the users that we have configured above when we try to connect to the terminal line of the router using Putty, we are asked to provide for TACACS username. After pressing enter, we will be asked for the password of the username just entered. If the username exists in the configuration and the password supplied is valid, the user is granted access to the operational mode of the router. Typing enable command and entering the enable password earlier configured in the configuration file will allow access to the privilege mode of the router.


Accounting Test
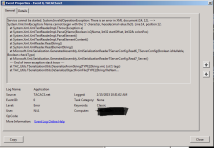
From the previous post we have learned that the accounting module of TACACS takes care of documenting about the TACACS session and what the TACACS users have done. To test this functionality, a few commands were entered in the configration mode after logging into the client router using the credential for User1. As shown below, User1 went into the loopback interface configuration, removed the IP address and shutdown the interface. If no log archiving is configured on the router, then these commands entered by User1 cannot be recalled back. But thanks to the Accounting module of the TACACS server all commands are captured as we shall see below.

The logs for the TACACS.net server are kept C:\ProgramData\TACACS.net\Logs folder. By opening the latest log file for accounting we see that the commands entered above have been recorded along with who the user was, the IP address of the User, the IP address of the network device, and the time stamp. This kind of information becomes very important when troubleshooting an issue or investigating an incident.

As we have seen from this post, it is relatively easy to install and configure a free TACACS+ server and use it for securing your network devices. In addition to authenticating users, we have seen also how all commands executed on network devices can be recorded for later investigative purposes. Furthermore, we can also implement an Authorization module which restricts what users can or can not do once they are authenticated.
Update 1
I have noticed on a couple of occasions after the installation of Tacacs.net is done, the service installed is not started by default and clicking on the start services will start and stop the service immediately. After some investigation, i checked the logs in the event viewer and noticed that the service did not start because it encountered some XML errors. I checked the tacplus.xml file and found there were improperly placed statements. I fixed the statements and the service started properly. I found this issue occurs if previous configuration files are existing when installing the software. Just check the error message which most of the time tells you the line number to go and check where the problem is.


